Thursday, December 31, 2015

Tessuti Kate Top

Over at Pattern Review there has been a contest for New to Me Patterns for the month of December.


New to Me Pattern Company Contest


Around the same time Tessuti launched their new pattern - The Kate Top.

I've never used a Tessuti pattern before and this one appealed to me as a suitable top for both work and casual tops for my wardrobe.

I decided to make an XS and View A but first up in a toile only doing the following adjustments to the pattern:

-  Front neckline gaposis of 1cm
-  Back neckline gaposis of 1cm
-  Sway back adjustment of 1.5cm

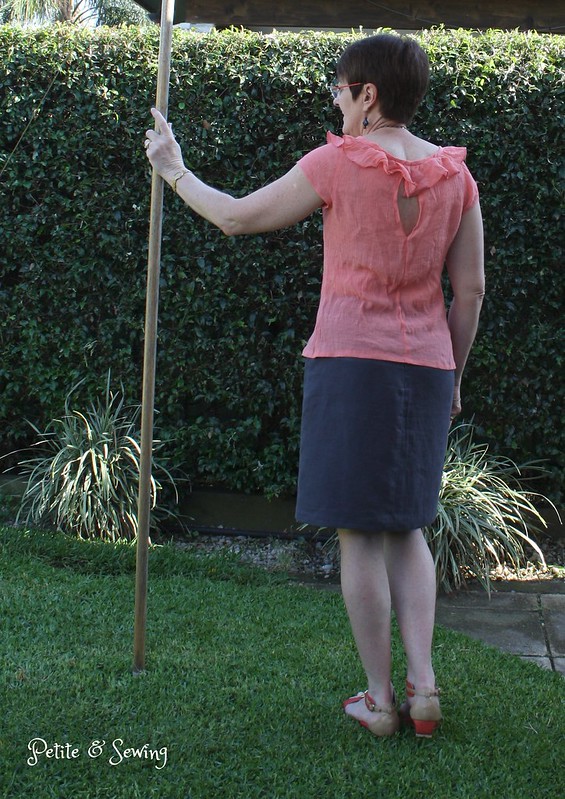
I took this to my ASG meeting to see if the girls could help me get a better fit as I found it unflattering on my figure.

I don't like the pregnant look.
So I added the following adjustments:

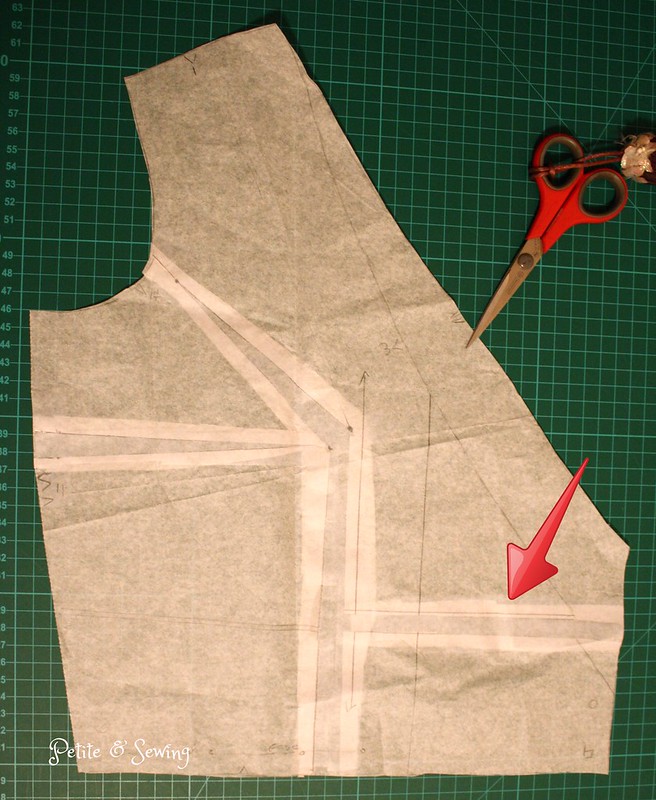
-  raised the shoulder by 1cm at the neck edge to 0.5cm at the shoulder.
-  high round back of 1cm
-  took out a dead dart vertically below the bust apex 1cm at the hem line to noting at the bust which removed some of the fullness.

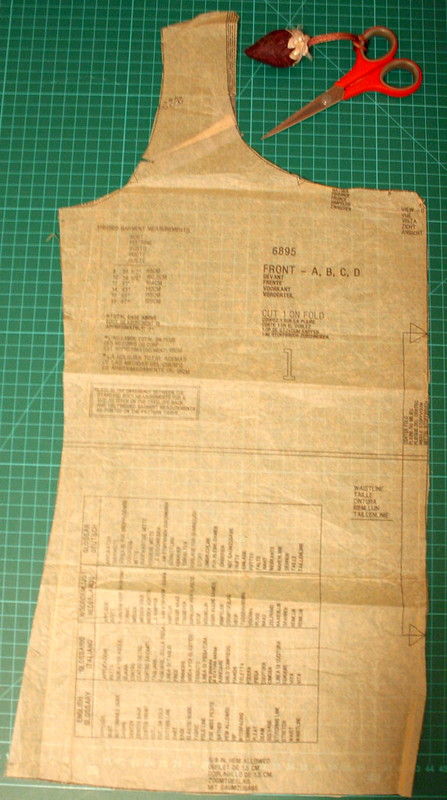
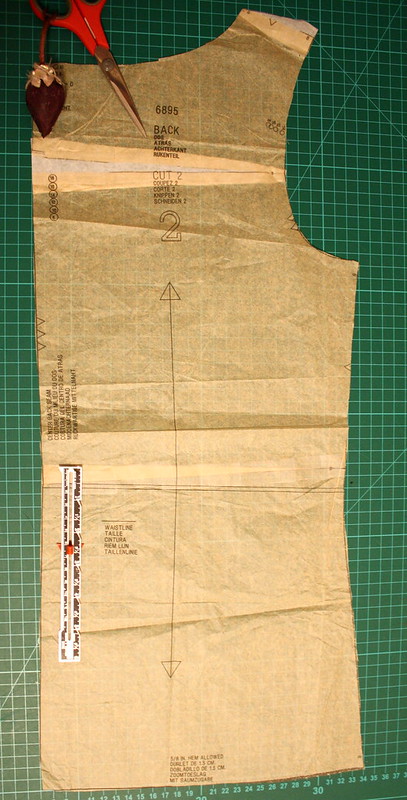
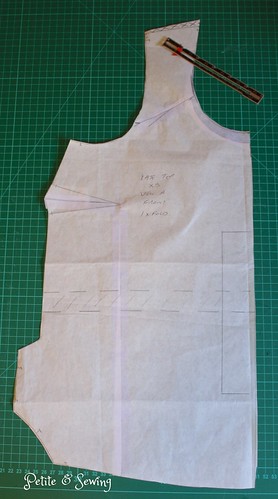
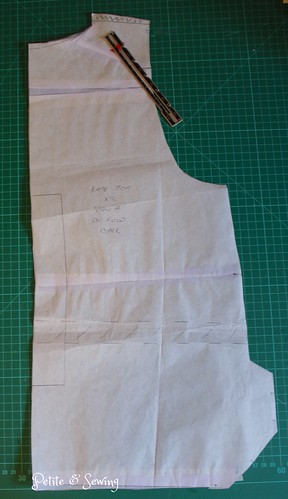
Here are what the pattern pieces now look like:

Front pattern


Back pattern


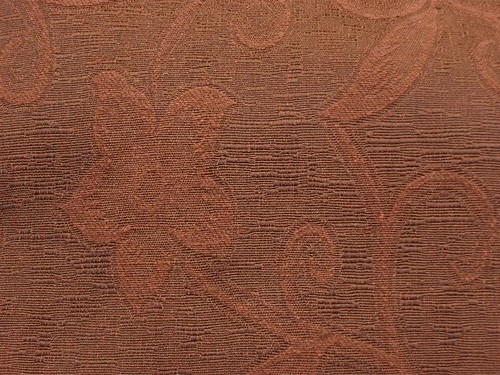
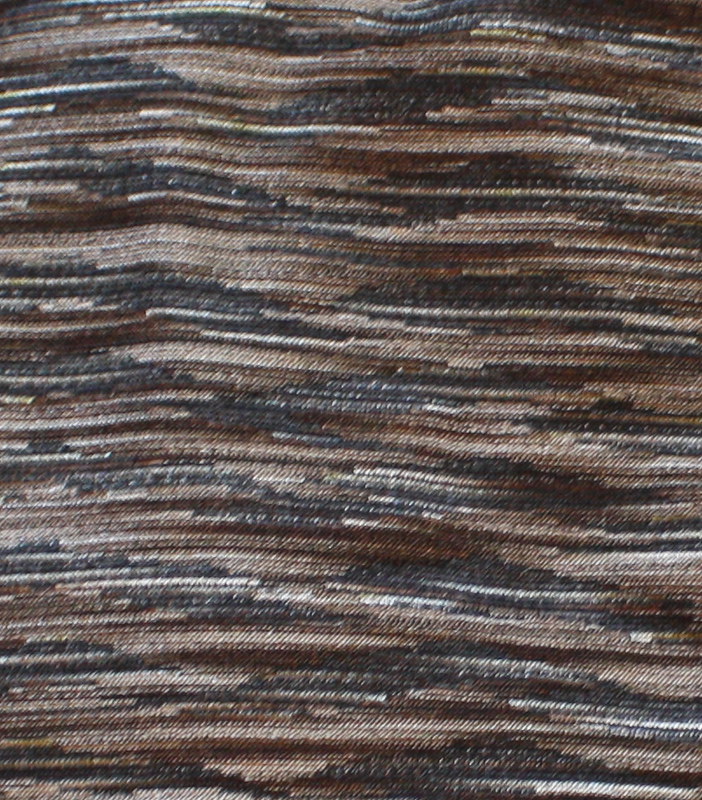
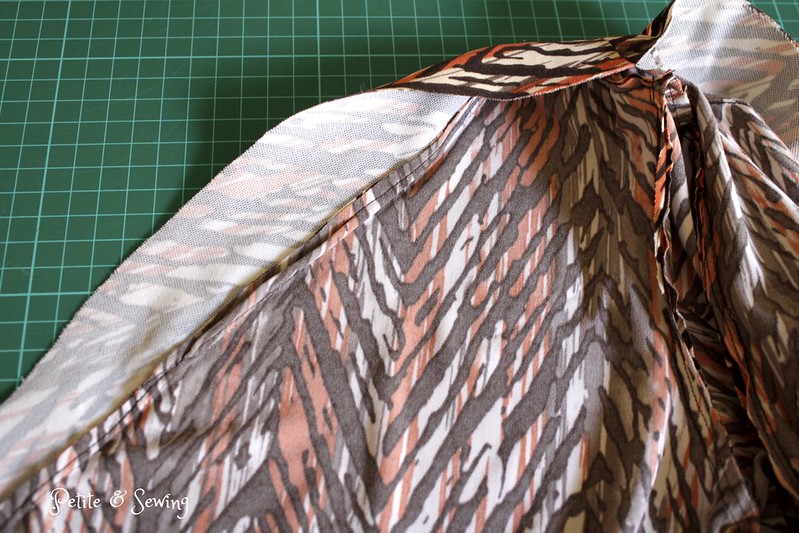
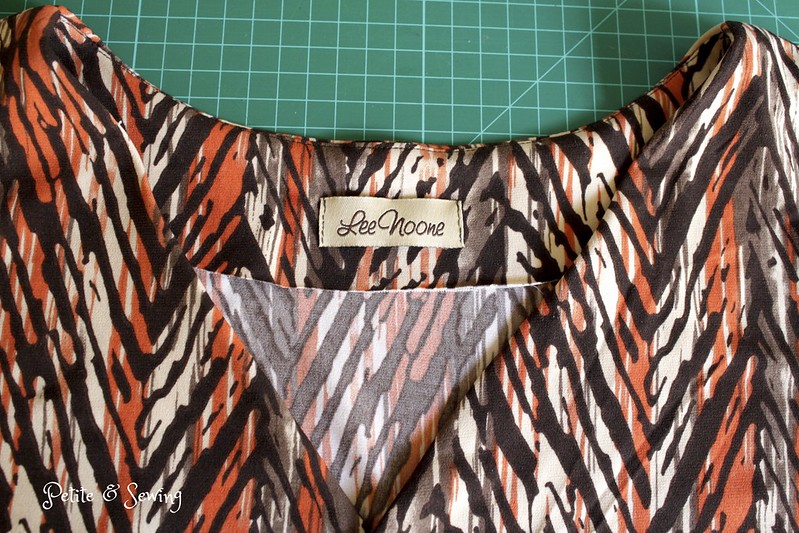
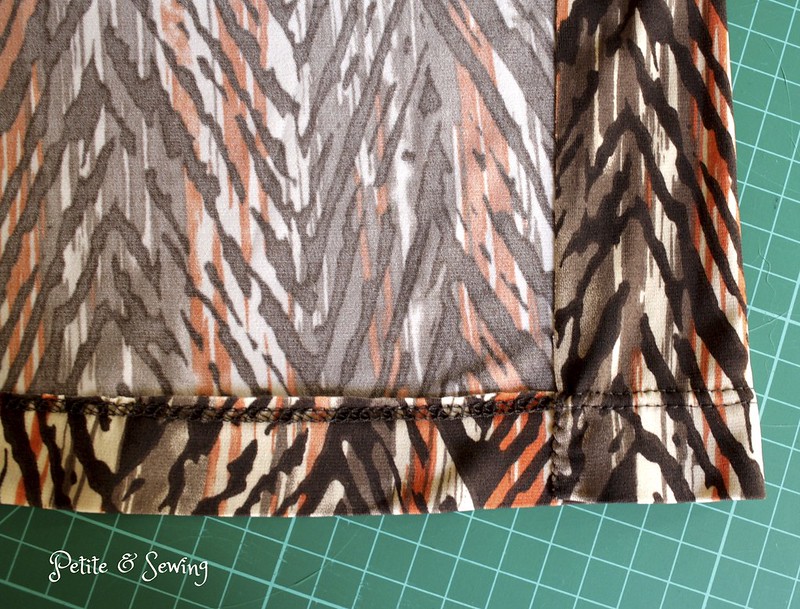
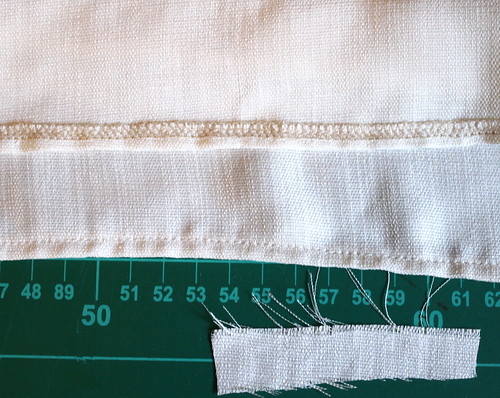
I then found this fabric in my stash and had no idea where it came from or what it was. So I did a burn test and it appears to be a loosely woven polyester. One thing I do know is that it frayed like mad and I had to overlock the hems so that I would have something to turn under.


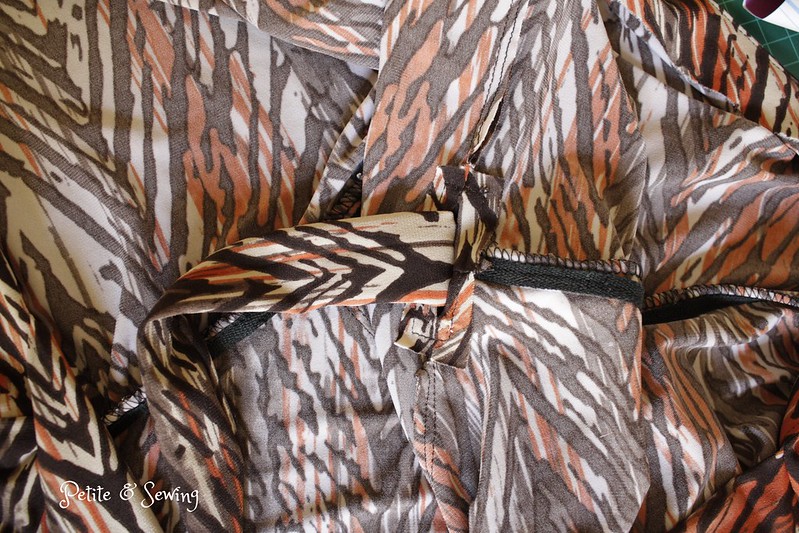
One thing I did notice was that the pattern is very well drafted all the pieces fit perfectly together and the way Tessuti has drafted the mitre corners on this top is very clever and the finished result is perfect.


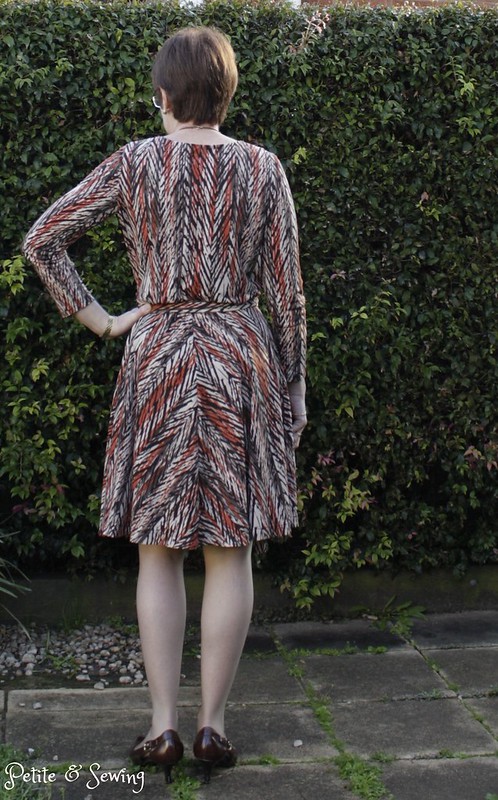
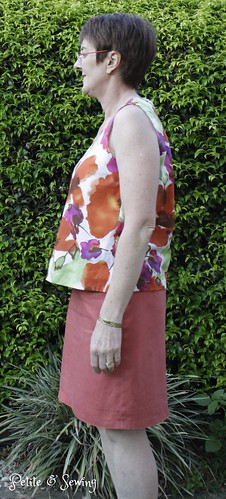
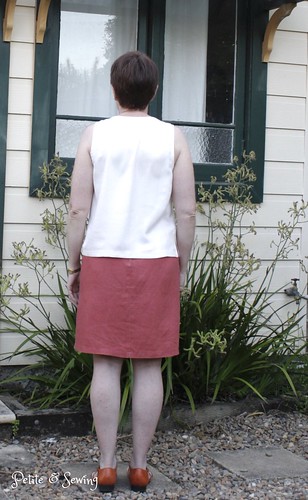
and now for the finished top


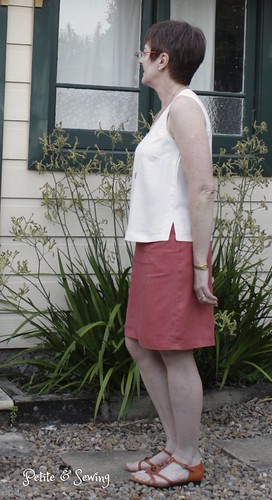
I like the front better now but will wear it a few more times before I decide to make it up again in the gorgeous cotton voile I found in my stash.

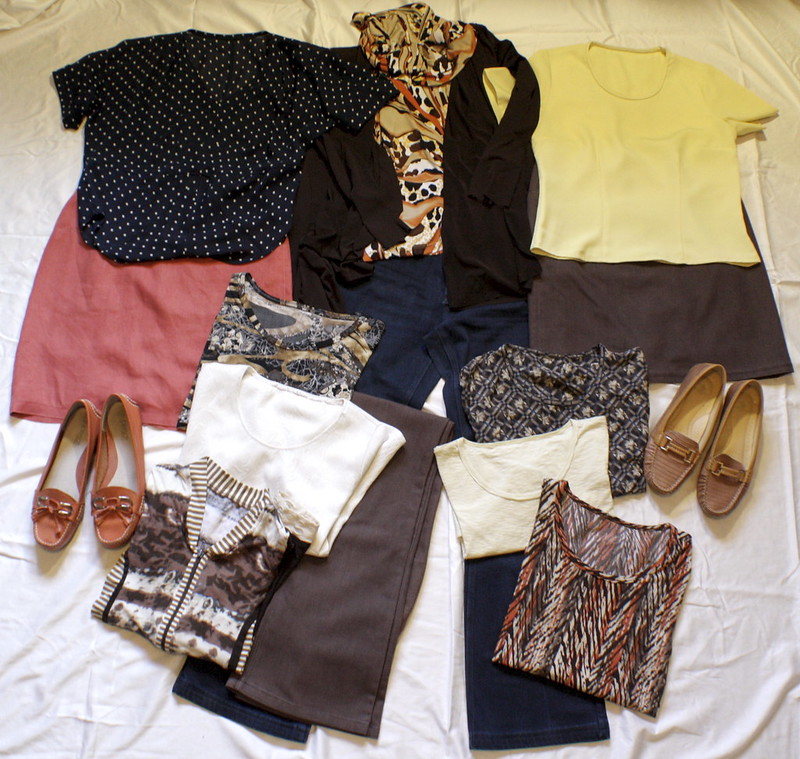
I haven't mentioned SWAP 2016 yet, and will soon, but this is my first top.

******************
2015 Stash Out: 20.45 m
2015 Stash In: 18 m

Wednesday, December 30, 2015

The Tiny Essentials Tote Bag

In November the Australian Sewing Guild posted that they were going to host their first Sew Along, The Tiny Essentials Tote Bag and I decided to sew along.

Back in 2012 when I did this workshop I purchased the fabric from Ikea, I also purchased the fabric below designed by Cilla Ramnek* 2008 designed for Ikea intending to make another Tote Bag.

However this, some black duck cloth and some green/yellow circles that were in my bag stash just wanted to play along.  


The interfacing was on hand but the 24" Long Pull Zip that I wanted in green or black wasn't and this isn't something that I was going to find locally.   Luckily Alison pointed me in the direction of Zippit and I placed an order for the zips.

Whilst waiting for my zips to arrive I did manage to complete up to Day 2 of the Sew Along

Quilted, handles made and pinned on.
and then when my zippers arrived, it was decision time - green or black?


I ended up choosing the green as the gusset for the bag is black.

Then life got in the way and it has taken me until now to finish this bag.


and here you can see the gusset and zip


I decided to use a lingerie bag for part of the inside of the tote keeping the zip to keep the contents secure and then put covered elastic on the other side to hold chargers etc.


and loaded up to go on holidays, although I'm certain I take more cables than this away!


I learnt quite a few techniques with this sew-along and I also know that my piping needs more work.

Every time I look at this bag it makes me smile, I just love those trees!


* Here is some more information about Cilla Ramnek here.

******************
2015 Stash Out: 16.85 m
2015 Stash In: 18 m

Monday, December 28, 2015

Twas 5 nights before Christmas .....

and I decided to make an extra gift for Mark's nieces and nephew.

This is where sewing with your friends on 19 December  at our ASG Group at The Remnant Warehouse is dangerous.  Deborah was making the Bendy Bag by Lazy Girl Designs and I was keeping a close eye on how this went together as I had the pattern in my stash and do have intentions of making one for myself.

Well Deborah made 2 in the one day of sewing so that got me thinking and when I showed Mark what I was thinking of, he said yes and he would have one as well*.

So again the bag stash was raided and so was my zipper stash as I needed  a 14" zipper for each bag.

The only thing that Deborah and I weren't that thrilled about was that the lining seams are visible and I did try and work out how to hide them but really don't think it is possible.  So I took some of the offcuts over to my Juki and tried a few finishes.

This is what I found worked best for those seams.

Stitch length of 1, Blade at 3.5 and foot pressure H.


I did manage to get two sewn during the working week and I was very thankful that our office closed on 23 December so that left me Christmas Eve to finish off the other two.


These were well received by Mark's nieces and nephew and there were quite a few hints from other members of the family, so I might have next years gifts for some already worked out!

* Mark is still waiting for his!

******************
2015 Stash Out: 15.85 m
2015 Stash In: 18 m

Sunday, December 27, 2015

Kris Kringle gift


Earlier this month I attended the Australian Sewing Guild Region Day and AGM at Bernina Chatswood and we could take along a Kris Kringle gift.

Now this is where reading blogs can give you some great ideas.  The site that I find quite interesting during the lead up to Christmas time is Sew Mamma Sew, during the month of November where they have new tutorials, recipes and printables for all areas of your life for Handmade Holidays.  They also do a blog post that lists all the ideas together, 9th Annual Holidays Tutorials.

When I saw the Scissor Cozy I knew this would be great gift for any of my sewing friends.


Luckily everything was in my stash except the small amount of ribbon.


The scissors aren't part of the gift, but I did print out a picture of a pair of scissors and put this inside the cozy in case it wasn't clear what is was used for.


******************
2015 Stash Out: 15.35 m
2015 Stash In: 18 m

Sunday, December 20, 2015

Getting to know my Juki

As you saw here I am the proud owner of Juki MO-1000 which has a few more features than my old 4 thread Singer Ultralock 14u 34, so when in2Mode offered the Taming your overlocker workshop I signed up as I thought this would be worthwhile.

It was held over 2 Sundays and by the end of the 2nd week we had a cover for our overlockers, showing all the wrong and correct ways to use it, making it an easy reference guide.

We had 8 squares of fabric with 2 curved end pieces, so on each square a different technique was tried e.g. flat locking, pin tucks, rolled hems.

After all the blocks were completed then 4 where joined together for a front and back and then we were supplied with white cotton and bamboo wadding to complete the cover.


Front

Back

Side without pocket
I was quite impressed with my Juki, when I came to put in the end piece there was 2 layers of bamboo wadding as well as the front and back pieces with their lining to stitch through and she didn't miss a beat.

One things the teacher did realise is that the Juki is quite a bit higher and wider than any of the other overlockers in the course so mine is a bit snug.

There were 6 of us in the workshop a which was a very good size and a diverse group of sewers.


Sunday, November 29, 2015

Watermelon frill

When I first received this Spy polyester rayon fabric from Kerryn's Fabric World, I had planned and had nearly finished another version of Vogue 8572 (OOP).  It was a disaster!

Now I had purchased 1.5 metres of both a salmon and watermelon colour so I had just wasted .8 of the salmon and was at a loss of what to do with the rest of the fabric.

I emailed Kerryn Swan with my query and this is her reply:

"Hi Sharon,
Because you are a fine build and the fabric is soft you need a garment that adds some soft bulk. If the garment is simple, plain it will be too flat on you.
A peasant style for example would be perfect.
Look at New Look 6179, 6599, 6891, View D, 6895 View D 6781 and 6104.
Cheers
Kerryn Swan"

From Kerryn's suggestions I really liked New Look 6895, View D and was very fortunate that my sister had it in her stash as it was discontinued and she kindly gifted it to me.

I cut out a size 8 and then did the following adjustments:

  • 1cm front neckline gaposis


  • Round shoulder (both front and back)
  • 1.5cm round back adjustment
  • 1.5cm sway back adjustment


  • Moved the sleeve cap for the round shoulder adjustment


  • Raised the back opening by 2cm as it was showing my bra strap.

Once this was all cut out, I started to try to figure out how I was going to finish the ruffle.  My trusty Singer Overlocker does do a rolled hem, but I have to pretty much rebuild it do achieve it.

So this is where going to the Quilting and Craft Fair with your sewing buddies is quite dangerous.  At my ASG Group the day before, Renata told me that Juki was at the fair and she had a couple of brochures on overlockers with her.

Now I didn't go with the intention to purchase but after sitting with my sewing buddies and giving the pros/cons of a new overlocker, I took home with me


I took this to my next ASG meeting and much to the amazement of my sewing buddies they couldn't believe I hadn't touched it until then and they couldn't wait to see what it could do.

It did take me some time work out the tension and this is where Alison, the Overlocker Whisperer was so generous.

Once Alison sorted out the tension for me, it was so lovely to push one control and you are all set up for a rolled hem.


It was also at this meeting that I was having issues with the neckline gathers and keeping them in place and again Alison suggested to use Solvy to keep them in place.


There are lots of advantages of sewing with your friends.

Now I did manage to get this top finished for our holiday to Hamilton Island back in July, but we had very unseasonal weather with low cloud and flights cancelled and this top stayed in my suitcase.

It wasn't until last week that we had a warm enough day (41c) to wear it.


This top is another item completed from my "To Sew, Knit or Purchase" list.


******************
2015 Stash Out: 15.15 m
2015 Stash In: 18 m

Sunday, November 22, 2015

Japanese Knot Bag and November Stashbusting

I follow Sue from Fadanista and this month she hosted a sewalong for her Japanese Knot Bag.

This bag has appealed to me from the start and I was very happy to sign up for the sewalong.

For my bag I used some home dec fabric which I had purchased from Spotlight back in 2009 for a jacket in my SWAP plans but it never happened and now the fabric stood out for the perfect evening bag.


I reduced the bag pattern by removing 2.5cm (1") around the bag as I wanted a small bag for date nights.

For the main fabric I used some black SheerWeft to stabilise it.  The lining is a fat quarter of quilting cotton that was in my stash and I reduced the lining pattern by a scant 3mm (1/8") so that the seams would roll to the inside.

One of the things that I am quite obsessed with is pressing, so even with this bag the pressing happened.  This is where my silicone mitt comes in very handy.  It looks like the one below.


This lets me put my hand inside the bag and use the edges of the mitt to press the seams open.

This is version 1.

Here is the finished bag and the goodies that I carried it in.  Hubby even managed to get his wallet in there as well.


The lining

Oops no pattern alignment!
and finally how it went out last night.


and I can't believe I have managed to complete a piece in time for the Stashbusting Sewalong :)


******************
2015 Stash Out: 13.95 m
 2015 Stash In: 18 m

Sunday, October 18, 2015

ASG Convention 2015

I've been home a  couple of weeks from Brisbane where I attended the Australian Sewing Guild's 14th National Convention and thought I would share my travel wardrobe.

Time away:
10 days

Where to:
Brisbane

Season:
Spring, however Sydney put on a cold snap when we departed for our road trip north.  The temperature range was 13 to 26c.

Activities:
The first two and last two days were driving the 923klms from Sydney to Brisbane with two of my sewing buddies and we did manage to stop at a couple of fabric shops along the way.

Convention includes a lot of walking to/from your accommodation, classrooms, dining hall as well as lot of stationery activity at our desks.

We had a free afternoon on Wednesday so my sister collected me and we headed to Voodoo Rabbit, Fabric Collection and Sckafs but only a Prym measuring tape came home with me.


Colour scheme:
Navy, orange, off-white, brown and yellow.


What I packed: (each garment is linked to its original construction post - left to right; top to bottom)


Vogue 1247 top in navy chiffon with white spots
Vogue 1247 skirt in burnt orange linen
Orange Loafers
Simplicity 2603 brown mercury jersey cardigan
KS 3740 orange swirls top
Jalie 2908 navy jeans
KS 3740 blue and gold swirls top
Vogue 8572 off white damask top
Jalie 2566 Fractured knit cardigan
Jalie 2908 brown jeans
Vogue 8572 lemon polyester top
Vogue 1247 brown denim skirt
Vogue 8572 navy and gold silk top
KS 3740 lemon slub knit top
KS 3470 orange arrows top
Taupe loafers

Also in the suitcase was:
This is the most I have ever packed for a trip away, the benefits of travelling by car!

Verdict:
I really enjoyed wearing this wardrobe and once I arrived in Brisbane the jeans only got worn at night as it was a bit cool walking around.

Unfortunately I didn't expect it to get as warm as it did and would have liked a pair of sandals to wear on the last few days, Brisbane's 26c is a lot warmer than Sydney's 26c.

Fabric and goodies:
On way our north, we called into Fantazia Fabricland at Tweed Heads and this fabric particularly leapt of the table into my arms.


Then I walked into the haberdashery shop and found a wall of Prym goodies, so 2 packs of the jeans rivets and 1 pack of Anorak studs followed me home as well.


Convention Workshop:
I spent the week with Roberta Thompson in her Alterations and Toile Fitting 4 days workshop and I hope to have a pair of pants to show you sometime soon.

******************
2015 Stash Out: 13.55m
2015 Stash In: 18m

Sunday, September 13, 2015

Diane Von Frustenberg Vogue 1548

I couldn't believe my eyes when I last visited my Mum and found this in her pattern stash, how had I not found this before, and she can't tell me when she acquired it.


This pattern comes in one size only and this is a size 8, with measurements of:
Bust:  80
Waist: 61
Hip: 85

and the only finished length was the finished back length from the base of the neck to the hem.

Seeing my measurements are larger than those above for the bust and waist, I wasn't quite sure how to tackle this.

I first went to Pattern Review to see if there were any reviews and there are two but only 1 with working photos from Twinset back in 2007 which unfortunately if you are not a member of Pattern Review you can't see that far back.  What I did notice with the photo was how wide and low the neckline was.

So I dug out Butterick 3344 which I have made previously and compared the bodice pattern pieces.


I also did a FBA of 1cm and realised quite a bit later that I had put the horizontal line in the wrong place together with my adjustment to the make the neckline less revealing made the tie square very large.  This meant I had to do some creative adjustments when sewing the facing on.


The other changes I made to the pattern were to:
  • add 1cm to the back waist seam as I did to the front with the FBA
  • straightened the side seams at the waist on the bodice by 2cm.
  • cut off 17cm at the short dress length as it was extremely long on me and this also let the front pattern piece fit across the width of the folded 150cm fabric.
  • I didn't add the pockets
  • I only made the tie opening on the left hand side as I don't intend to try and wear this dress back-to-front
Now this fabric has been maturing in the stash since 2012 and I have already used some to make a version of Kwik.Sew 3740.

I used a knit interfacing for the facings.


I also didn't finish the raw edge of the facing, as the bulk of that seam would have annoyed me.

The instructions are very detailed and easy to use and it is made completely on my sewing machine as it has travelled with me to various sewing groups.

The ties for the dress are very long, so I was very thankful to have my Fasturn tubes with me which made turning the ties out so much easier.

I really like how you use twill tape to stabilise the waist when attaching the bodice.


The back neck facing kept rolling out even with clipping and under stitching and it wasn't until I read Vi''s blog Finished Seams where she showed quite a few details of a real DFV dress reminded me that that I could also used my label to keep the facing in place. 


I did use my Coverstitch for the hems.

Dress hem with facing slip stitched in place.
Sleeve hem.
and this is how the dress looks on.


and the twirl factor


For future versions, I need to do the following adjustments:

  1. Neckline gaposis
  2. Round shoulder adjustment
  3. The 1cm I added to the waist seam needs to be removed
It is a very comfortable dress to wear and the cross-over is very generous, so no exposure was apparent during the twirling session.


******************
2015 Stash Out: 10.55 m
2015 Stash In: 16.5 m