This is the method that my DS showed me many years ago which I have used ever since with 100% satisfaction and you will see that you have the chance to fix any issues before those small stitches are sewn.
First up I machine baste the seam allowance on both pieces of the garment. I am working on a skirt for this tutorial.
Then I place a pin 2cm down from both top edges of the garment pieces on the basted line. The reason I use 2cm is 1.5cm for the seam allowance and then I leave a .5cm for a hook and eye. You can place the pin at 1.5cm so it sits flush with your facing.
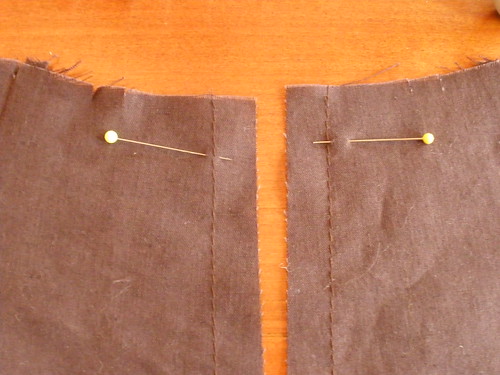
Tuck under the seam allowance (basted line) and line up the zipper teeth with the baseted line and the zipper stop with the pin. This step lets you check if you are sewing it to the correct surface.

Then fold the seam allowance back out and then pin the zip in place on both sides.


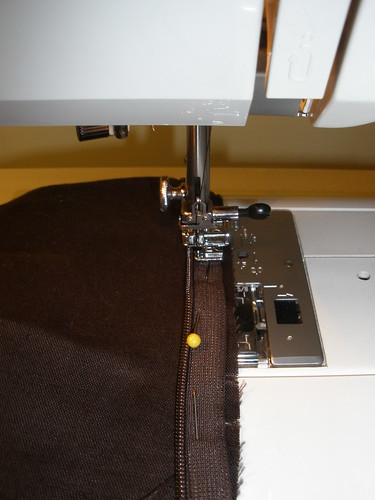
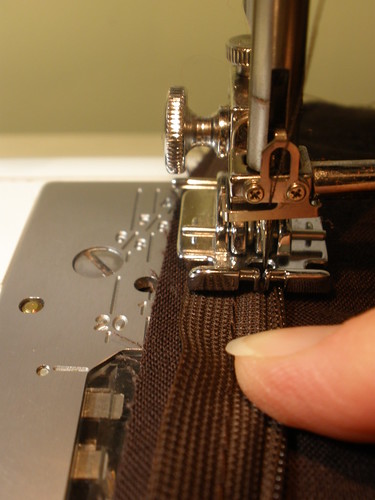
I then baste the zip in place using the normal zipper foot, sewing from the top down on both sides, it doesn’t have to be right up against the zipper teeth, this is your safety net to make sure that the zip is where you want it to be.
Now do up your zipper and check that is where you want it to be.

If the zip isn't where you want it to be then you can easily pull out the last lot of basting stitches and redo them until the zip is in the correct position.
If it is all aligned, then using the “invisible zipper foot” open the zipper and place the zipper teeth into the grove on the foot ensuring that the needle is on the correct side of the zipper teeth. I move my needle position 2 postions from the centre either way (depending on which side I am sewing) and use my finger to roll the coils away from the needle as I sew. Sew from top to bottom on both sides with your regular stitch length.
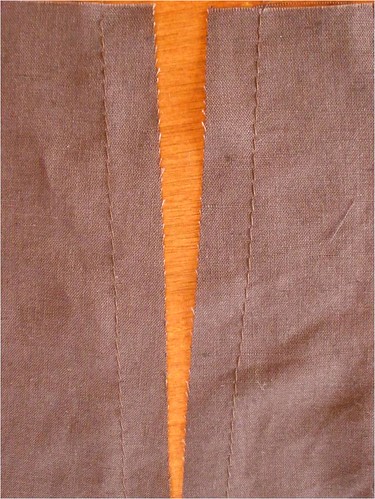
Here is the zipper sewn in.
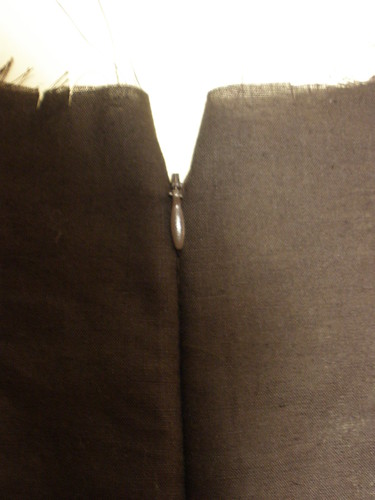
The seam below the zip can be sewn first or last, and this tutorial works perfectly for both.
Completed back seam

Okay you now have to take out two rows of basting stitches, but they are a lot easier to remove then those smaller stitches.
The next step is the facing finish and if you have Australian Stitches Vol 10, Issue 10, Martyn Smith demonstrates this step-by-step on page 20. There are also a number of tutorials available on the Internet.


9 comments:
Fantastic tutorial! Some sewers dread putting these in, but no need now - thanks to this.
Invisible zips are just the best!
That's a nice tutorial. Great photos. Thank you.
Thanks for this tutorial. Since I do plan on conquering the invisible zipper application THIS YEAR, I'd better get to making some skirts to put this method into play.
Well done Sharon! Now hopefully we can all have multiple garments with invisible zips inserted properly so that they don't splay OR catch!
Luisa R
That bottom where the zipper meets the seam is where I always have a bump. I'm trying it you're way next time. Thanks!
Thanks so much to share this!
I am allays tetanised with these *evil* invisible zipper.
Sharon I'm so glad you posted this. It not only helps others but alway will help me if I ever forget what you taught me!
Yes invisible zips are magic - great tutorial!
Thanks for your tutorial and for answering my question about the framer's tape dummy. You are very helpful.
Post a Comment