Trace the pattern from the magazine.Make a toile to ensure all is right.Decide if I want it to be double breasted as my RTW isn't?Decide on what zips I want to use and place my order with Zipperstop.Gather my bedtime reading from a number of Threads magazines to figure what else I need to do.
During my bedtime reading I read Threads Issue # 19, page 30 where David Page Coffin talks about "Stalking the Perfect Raincoat" and this made me realise that I wanted a hidden-button fly front as my closure as this is what is on my RTW Trench and I really like the clean lines.
So the I traced off the pattern and then found quite a few places that showed me how to do a concealed button front for a shirt, so using my RTW Trench as a guide I made the folds 5cm each. At the same time I also drafted the back storm panel.
Then it was time to cut out the Trench in calico to make sure it fitted and also to see if could understand the lovely Burda instructions.
A couple of notes I did make during construction were:
- Is there a better way to do the pockets? You sew the seam first and then fiddle with the pocket bags.
- Is there a better way to do the collar?
- Looks like the sleeve head has too much fullness in it for this type of fabric.
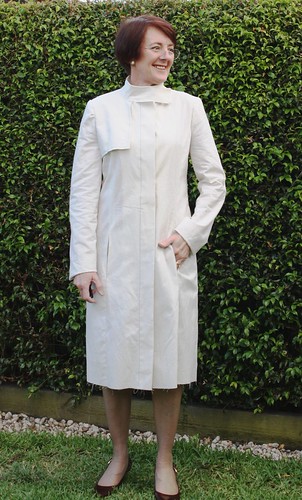

I've decided that I don't like the gap between the centre front and the collar and I'm also not so sure about the collar extension or how it sits when the Trench is open?

Last weekend my sewing buddies and I got to spend some more quality time with Angie Zimmerman getting our patterns fitted and this is what we have decided to do with the Trench:
- I can put the pockets in first (before I sew the seam), but I need to ensure that they line up perfectly when I sew the side seams.
- Well the way Burda does the collar is the tailored way, you live and learn. Angie did give me some more information for a better finish than the brief Burda instructions do.
- Angie did think that I got the sleeves in very well in the calico version and suggested I leave them as they are but looking at the large tuck on the sleeve in the first picture above I'm not so sure.
I'm still reading magazines/books and watching DVD's however it now looks like I'm ready to cut out my fabric, but first I need to make the lining pattern as I didn't want to do this until I had checked the fit.


11 comments:
It's looking fantastic, Sharon!
Great work! And it will all be worth it when you slip on the finished product!
(Love the pic with your dog of his back to the camera - just like you!)
Brenda
This is looking great. I am sure all of your hard work will pay off beautifully.
This is coming along beautifully and will be such a timeless classic coat. The style looks great on you.
Your coat is fabulous. The muslin looks good enough to wear as is!!!!
The muslin looks pretty good to me. The style is very streamlined.
It's lovely. I really need to get my act together and start tracing patterns!
It's going to look wonderful when it's all done - I hope you're enjoying the journey.
Great fit, but I have some collar reservations. It look a bit odd open
Great looking muslin - the coat should work out really well.
Its hard to see any details in the white calico, but the fit is looking terrific. The style is just lovely on you. I cannot wait to see further developments :)
Post a Comment